If you are like me and do not have much building experience, or you are not sure how to build a covered shelter for your peafowl, this article will hopefully give you some guidance.
This specific covered shelter is for green peafowl. Since I am in Florida I do not need a fully enclosed building for green peafowl. If you are making a shelter for green peafowl or high % Spalding peafowl, insulation, heating, and 4 enclosed walls may be needed depending on how cold your winters are. If you are building this for an India Blue variety, than you don't need to enclose the shelter as much.
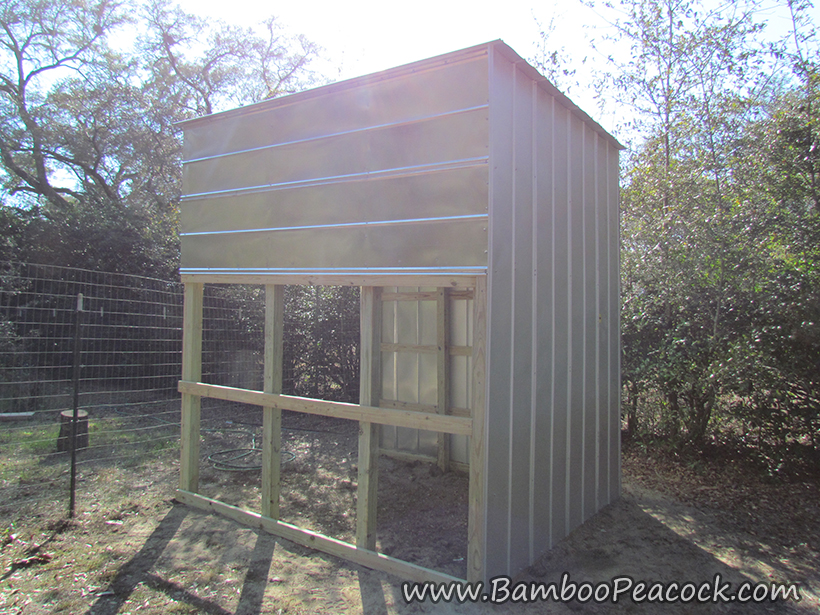
This shelter I will be showing the building steps of is 8ft. by 10ft. and it is 10ft. high with a 4in. roof slant. (2.4m x 3m x 3m)
8ft. should be a minimum size because the peacock's train will be around 8ft. so you want him to have enough space to turn. Also remember that 2 or more feet of the posts will go into the ground so for this shelter we got 12ft. posts so that we could have a 10ft. tall shelter. Keep in mind that the roosts need enough head room for the peafowl to stand on them without hitting their head on the roof. There also needs to be enough flying room for the birds to easily fly down from the roosts of the shelter.
1. Yellowwood Brand Treated Lumber
2. Tin
3. Long nails
4. Screws
5. Quickcrete concrete AKA sack crete
6. Electric Drills and/or an Electric Drive
7. Hammer
8. Shovel and/or Post hole digger
9. Measuring tape
10. Electric Saw (Depends on if the material is already correctly cut to size)
11. Extension cord(s) for saw
12. leveler
13. Pencil for marking wood
14. Step ladder (at least 2)


*Click on the photos for a larger view*
The first step is to start making the framework of the roof. For this we used the long nails and a hammer. Be sure to pause every now and then to check if things are level.


Next, use a post hole digger to dig holes about 2ft deep. These will be the holes for your posts. The first photo below shows you where to dig. At this point make sure the frame for the roof is in the exact spot you want the shelter to be. Then once you have dug the holes, you can use a scrap board with a pencil mark showing where 2ft. is to tap in the holes to make sure that you get exactly 2ft. If the hole isn't deep enough you can tap the wood to make it deeper or if it is off by a lot you can dig a little more out. If the hole is too deep then you can add a bit more dirt into the hole.


Now you can start putting the treated wood posts into the holes. Here we started with the 4 corners first. Make sure the posts are level in the ground. Get a bag of quickcrete and open it up right by the hole the post is in. Pour the quickcrete into the hole. Remember not to breathe in the concrete dust. Do not add water to the quickcrete yet. Later we will be adding water to the concrete.


Remember that roof frame that we started with? Now you are going to lift it up to the top where it belongs! The first photo shows the roof frame resting on nails. You can do this to make it a little easier to raise up the roof frame. The second photo shows the roof being raised up. This roof has a 4in roof slant, so if it looks a little off that is why. Once you have the roof frame up nail it in place. The last photo shows where to put the nails if you are unsure about nail placement or nail amount.


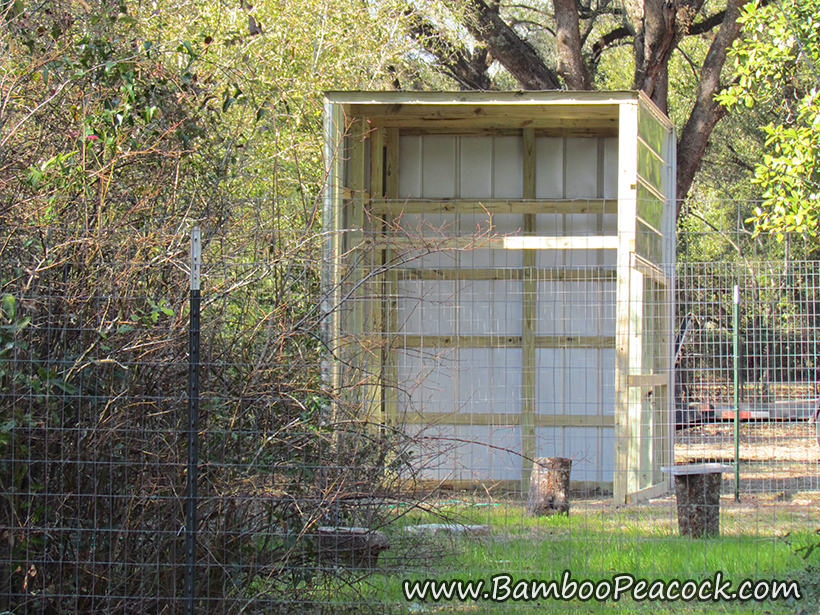
The basic framework is done. Now you will be adding more framework. Depending on how many covered sides you are making and how tall your shelter is, you may need more or less framework. Marking off where the horizontal boards will go across the posts will help you keep things aligned, but also you should still be using the leveler to check things. This framework will create a sturdy base that we will use to attach the tin sheets to. The side closest to the bushes will be fully enclosed with tin. The other side will be partially covered in tin and the back will be fully enclosed in tin. The roof frame will now get two additional planks so that there is a plank on either side of the center vertical posts.


Finally all framework is done! Now it is time to get out the tin and stand it up. Line up the tin groves and use an electric drill to drill screws into the tin. At this point you can add water to the quickcrete around the posts. When you screw the tin down, be sure that you are screwing it to the boards. You don't want bare screws sticking out on the inside because the birds could hurt themselves on one.


At this point 2 sides are almost fully enclosed. Before doing the partial enclosure of the nearest side, you can cover the roof in tin. It is even more important that you do not have bare nails sticking down from the roof on the inside of the shelter. If a bird on a perch or a bird flying were to hit that, they could get hurt.


Next comes enclosing part of the remaining side with tin. Later you can go back and cover the bottom half with welded wire.

Finally you can add the finishing touch - the roosts for the peafowl. Make sure your roosts are not too close to the roof. The higher roost is around 8ft. and the lower roost is around 7ft. You want the roost to be high enough that the peacock's train does not touch the ground. Peafowl love to roost up high so the higher you can make the roosts the better.